
So you’d like to learn to crochet but don’t know where to start? This post takes you from choosing a hook through to finishing your first granny square, and accompanies my Trade School class. From the outset it’s important to say that there are no set rules in crochet. You can hold the hook and yarn over in whatever way works for you. This tutorial is how I make a square and there are lots of other ways you can use. If this way doesn’t work for you, don’t give up! Feel free to comment with any questions you may have!
Getting started:
What you will need:
- Crochet hook
- Yarn
- Wool needle
First of all you need to get the right equipment. I’m a firm believer in not blowing the budget! Start cheap and cheerful and you can buy different size hooks and yarns as you improve and hone your craft.
A good place to buy from is your local yarn shop. Go in and introduce yourself and ask their advice on the yarns they stock. The relationship between yarn seller and crochet addict is a wonderful one and this is just the first of many new relationships you’ll form through craft.
Crochet hooks:
Crochet hooks can be made from different materials including metal, wood and plastic. I’d recommend starting with a metal hook as they are easy to get hold of and hardwearing. Modern UK hook sizes are measured in millimetres. You need different size hooks for different size yarns.

To start with, I’d recommend buying a 4.5mm hook. This is slightly larger than the 4mm you’ll likely need once you’ve mastered crocheting but most beginners tend to hold their yarn quite tightly and this size compensates for that. Your hook doesn’t need to be fancy with a grip or mould – plain metal will do just fine to begin with. You can always invest in fancy hooks when you’ve caught the crochet bug. When buying a hook, inspect the hook end to make sure it is smooth and free from any edges that could snag your yarn.
Yarn:
You can crochet with any fibre that takes your fancy; from wool to plarn and everything in between! To distinguish what it is you’re working with you can check the ball band that is around your yarn. This will tell you what fibre is contained, how much it weighs, how long it measures, how to care for it and what hook size is recommended. (You might want to keep hold of this for future reference!)
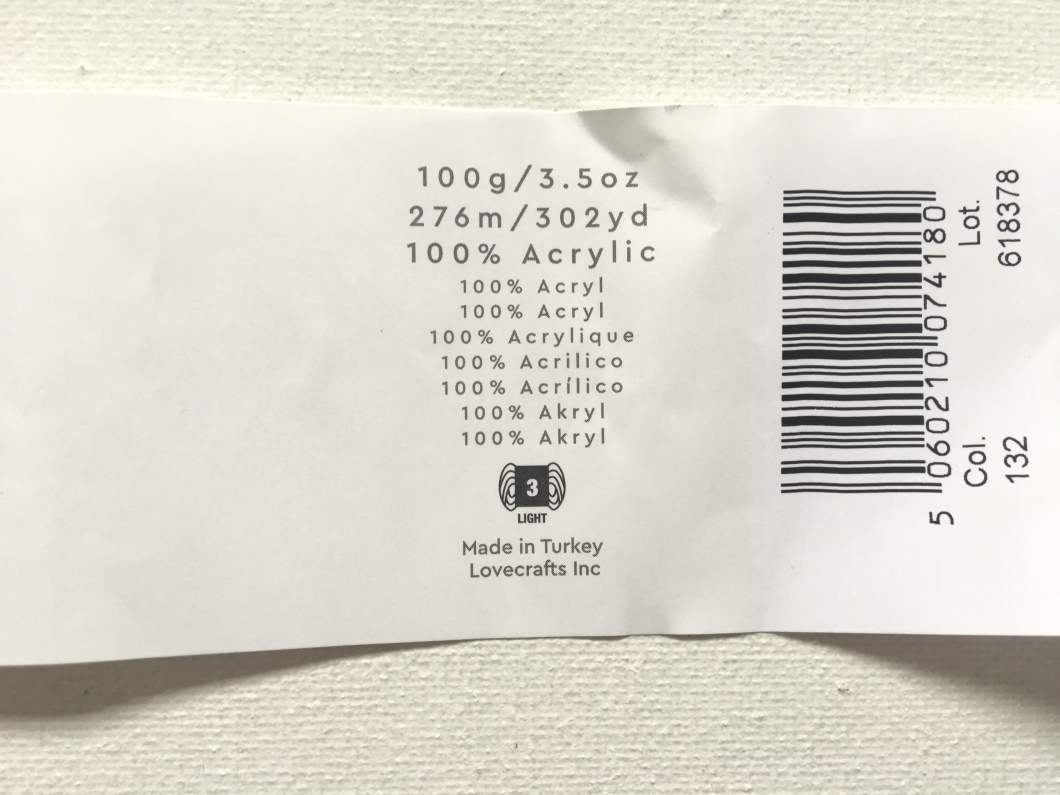

For a 4.5mm hook you’ll need one ball of double knit yarn, also known as DK. I would recommend an acrylic fibre. This is the cheapest kind of yarn available and often comes in 100g balls. It is machine washable and easy to care for. This yarn is the most popular size for crocheting things like blankets. It’s readily available in your local yarn or craft store and you may even find some in your nearby charity shops. Choose a colour that you like (so you actually enjoy working with it!) but not one that is too dark as it’s important for now that you can see the stitches you create.
Right, let’s get down to some crocheting…

Although crochet can look really complicated, as long as you master two basic stitches the world is your oyster! The first thing you need to be able to do is to chain. Chaining forms the basis of crochet and the gaps between stitches. Learning to chain helps you to understand how to hold your hook and yarn. It also helps you to learn what tension is and how it affects your work.
To start, hold the hook in your dominant hand. Form a slip knot over the hook and pull it so it fits snuggly on the hook but isn’t too tight. You should be able to slide it up and down the hook with ease. If you’d like more information on how to from a slip knot, I found this video from Happy Berry Crochet really helpful.
Chain:
With the skip knot on your hook in your dominant hand, hold the yarn taught in your other hand. Your yarn should always be behind your work.

Bring your hook over to the left of the yarn and back underneath so the yarn wraps over in a clockwise direction. This is called a “yarn over”.
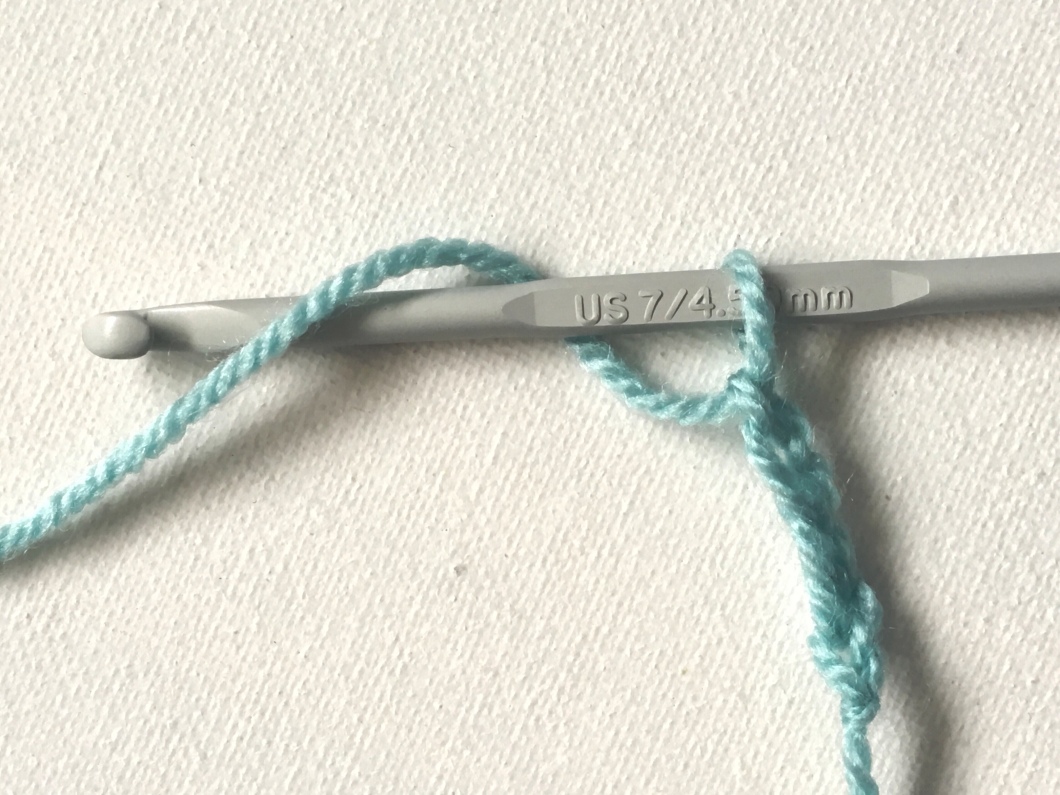
Use your hook to pull the yarn through the loop already on your hook to form your first chain. To make this easier you can hold on to the slip knot with your thumb and middle finger of your yarn holding hand.
Don’t worry; if you’ve never tried yarn craft before this stage is going to feel very weird and definitely like you need another hand! You’re likely to get stressed at how it doesn’t feel right. This can make the yarn tighter in your hands and make it more difficult to chain. Keep going and try and relax as much as you can. You can do this! I recommend chaining again and again for at least a metre. This should give you the time and confidence to find a rhythm and achieve tension.

Tension is a fancy way of saying that your stitches are uniform and even; not too baggy and not too loose. Achieving tension is a very important stage of your learning journey. Once you have mastered this you’re ready to move on to learning a few more basic stitches!
Slip stitch:
A slip stitch is used in crochet to join things together or move around stitches. It will be used in a granny square at the end of each round to join the first and last stitch. In a pattern a slip stitch is abbreviated to SS.
You form any stitch by putting your hook into the V at the top of the chain or stitch from the previous row. The V is where there are two parallel pieces of fibre on top, with one underneath. You will always put your hook underneath the V so it is on top of your hook with the stitch or third piece of fibre below.
To slip stitch,
- put your hook under the V, yarn over and pull this yarn back through the V using your hook.
- You will have two loops on your hook.
- Pull the new loop through the original loop so you have one loop on your hook.
UK Treble crochet:
This stitch forms the basis of all the stitches you will use in crochet. You either add more loops or take them away to form alternative taller or shorter stitches. In patterns, treble crochet is abbreviated to TC. (When you’re reading a pattern make sure to determine whether it calls for UK or US treble crochet as they are, very confusingly, slightly different stitches). This stitch will be used in clusters of three in our granny squares.
To form a treble crochet make sure you have a slip knot or chain already on your hook to secure the stitch.
- Yarn over once like you would to chain but don’t pull the yarn through, instead keep it on your hook.
- Insert your hook as directed into the round below.
- Yarn over again and pull this back through so you have three loops of yarn on your hook.
- Yarn over again and pull this through the closest two loops on your hook.
- You will have two loops on your hook.
- Yarn over and pull through both loops. You’ll be left with one loop on your hook
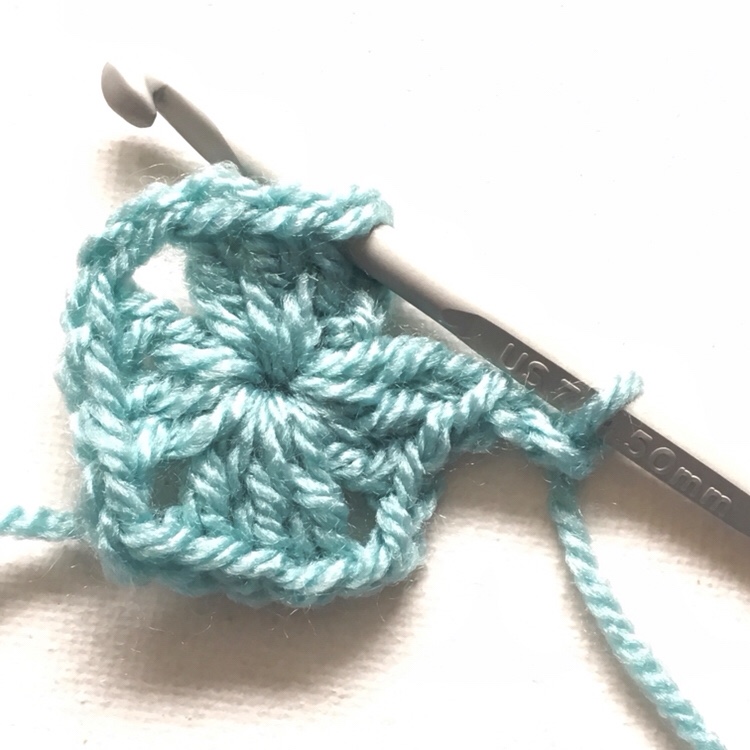
Right, let’s make a granny square!!!!

We’re going to put all the stitches I’ve just described together to make a granny square. Granny squares are what most people think of when they think of crochet. They can be used to make all manner of wonderful things; from tea cosies to mittens, dog coats to cushions and, of course, they make the most delightful blankets! And that’s where I think you should begin. Just keep growing your granny square round by round until you run out of yarn. This will help your hands to learn the stitches and you’ll have something lovely to show for all your hard work at the end too.
So what are we waiting for?! Let’s begin…
1) starting with a slip knot on your hook, chain 4 loosely. Slip stitch to the first chain you made (the furthest from your hook) to form a circle.


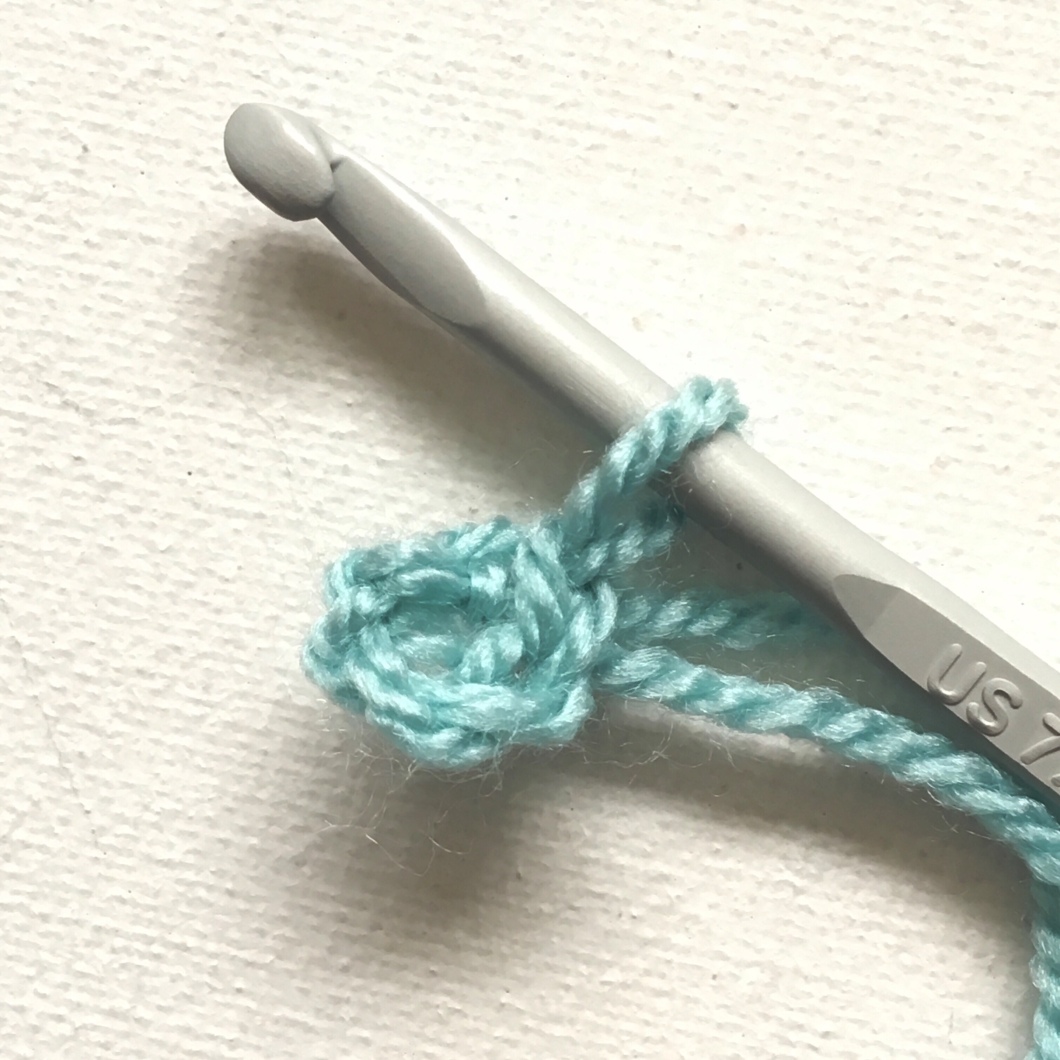
It’s important to keep track of this circle as all your first round stitches will be going into the middle of it. You can pull it in to a round shape and put your finger through it to help, and use a stitch marker if you have one.
2) chain 2. This brings you up to start your square but doesn’t count as a stitch in this pattern.
*Treble crochet three times into the circle space, chain 2 to form a corner.
Repeat from *three more times until you have four clusters of three trebles with corner chains in between.
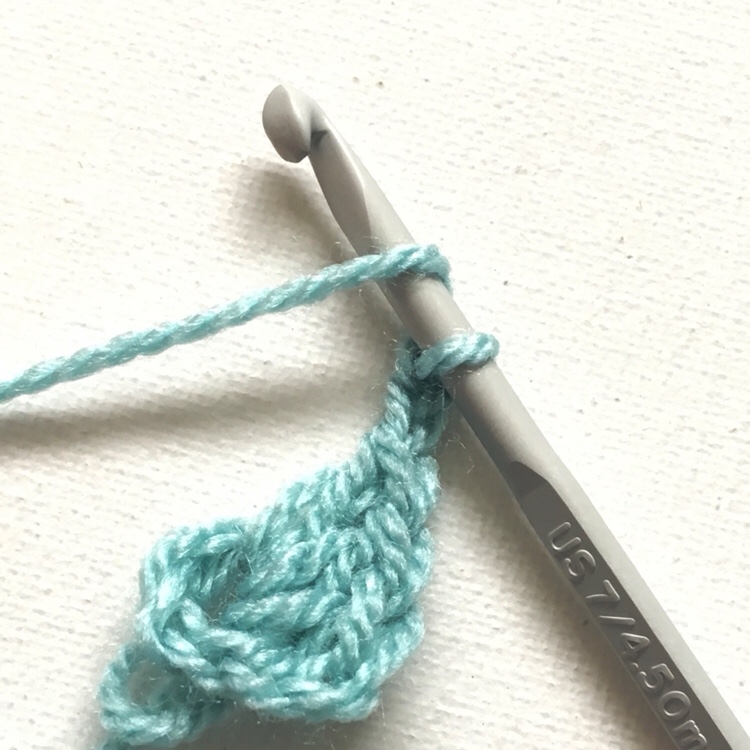


 Slip stitch to the top of your first treble crochet to join the first round and close your square.

Yay! You’re crocheting!!! You now have a square with four corners. This forms the first round of your granny square.
3) turn your work. Chain 2.
*treble crochet three times into the chain space below (not into the chain itself), chain 2, treble crochet three times into the same chain space. This forms a corner.
Chain 1, to create a side, and repeat from *three more times until you reach your beginning chain.
Slip stitch into the top of your first treble crochet.

4) turn your work. Chain 2.
*treble crochet three times into the chain space below to form a side. Chain 1.
Treble crochet three times into the corner chain space, chain 2, treble crochet three times into the same space to form the corner.
Chain 1 and repeat from * three more times until you reach your beginning chain.
Slip stitch into the top of your first treble crochet.

Continue as point 4. As your square grows the sides will get longer and you will add three trebles in each chain 1 space from the previous round. Your corners will continue to be in the same place and worked in the same way each round. Keep going until you have run out of yarn!
Use a needle to sew in your loose ends. Zig zag them back and forth through your stitches to help them disappear into the fabric and lessen the chance of them wiggling out!

CONGRATULATIONS, you have a granny square!!!
If you would like to change colour finish your round then chain 1 and snip the yarn, leaving a long tail to sew in and pull your hook up, knotting the yarn securely. Select your next colour and add it wherever you like by slip stitching into a chain space and chaining two to begin your next round.


Your square doesn’t have to be massive to make something functional – I made the fingerless mittens above by making a seven round square and sewing halfway up the side. The little teacosy is made from two six round squares.
I’m planning more crochet tutorials; if there’s anything specific you’d like to see please comment below.
As always you can find me on Instagram @cozamundo and Facebook. If you make anything from this tutorial please tag me, I’d love to see!

[…] the learners creations, like Rhea’s square above, has made me super proud. I wrote a new blog post to accompany my class, featuring step-by-step instructions on how to crochet a granny square along […]
LikeLike
[…] you’re a total newbie you may want to check out my learn to crochet a granny square post […]
LikeLike
[…] First things first, I feel a right fraud writing a post for the best known crochet square but what better place to start than with a classic ~ the Granny Square! […]
LikeLike
[…] Make a four round granny square – 1 chain between clusters and 3 chain corners (you may wish to alternate colours each […]
LikeLike